
 When I took one of the very first copies of Finishing Touch home last year, both my teenagers were immediately rather taken with the Pontus Pencil Case. They loved the chunky texture, contrasting zip and bright colours we'd made them in - easy to find in your school bag, apparently.
I promised them both a Pontus there and then - eager as always to furnish them with anything handknitted they will accept from me. I guess the idea of a teenager thinking that something is cool and desirable still somehow makes it so. I planned on one each in their Christmas stockings - filled with all sorts of edgy stationary, and personalised with a fun zip pull.
Planning was as far as I got, and as we headed into April, my son reminded me that he was still rather partial to the idea of a Pontus, especially with exams looming. I shuffled guiltily, gave a reluctant last look at the project currently on my needles and gave in. It wasn't long before I was delving into my stash of MillaMia Aran to see what I had.
Therein lay problem number 1. I needed a full ball of yarn to make the pencil case, and though I did have full balls they were all mentally allocated to larger projects. I found scraps left over from various other Christmas gift projects, and was rueing the fact that his favourite colours teal and ochre were only half balls, when I remembered the construction of the Pontus - knitted in 2 separate pieces - and had a lightning bolt moment. I would make it a pencil case of 2 halves!
The rest is history, apart from the emergence of problem number 2 when I realised that I had never actually sewn a zip into anything I'd knitted before . . . you'll see from the following pictures that the zip is in, and it works. Enough said.
The following tutorial is really an overview of the stages I went through in the making of the pencil case. If you haven't picked up stitches along a cast on edge before, the pictures will be useful. Likewise, picking up the 9 stitches along the side edge for the garter edging might offer some guidance.


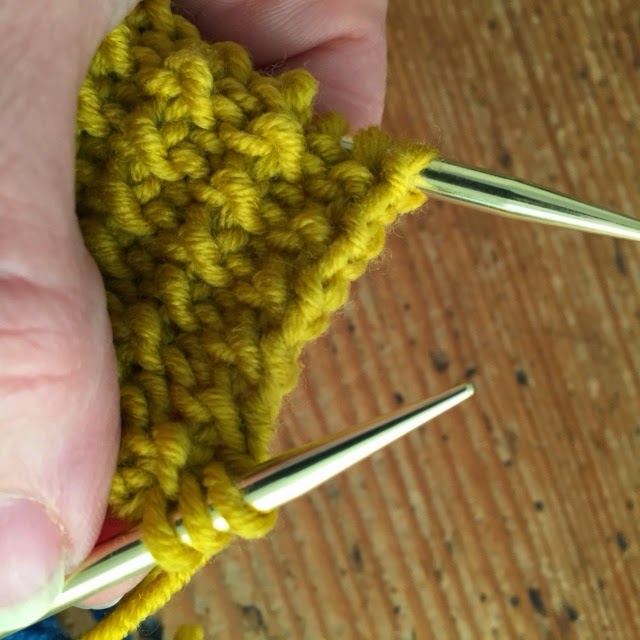
1) Picking up stitches along the cast on edge (right side facing). I've used a cable cast on so it's easy to see where to insert the needle to pick up. Make sure you go through both 'legs' of the stitch for a neat seam.


2) Make sure to go into the same place as you pick up every time for a perfect seam. When picking up exactly the same number of stitches as the cast on be aware that the very first and last stitches sometimes get a bit lost.

3) Picking up stitches for the garter stitch border along the side edge. There are naturally occurring gaps between the stitches but you may sometimes have to pick up another stitch between the holes. Make sure you pick them up as evenly along the given edge as possible to avoid any obvious gaps or puckering. Again, be sure to pick up in the same gap in the row every time for perfect neatness.


4) Once you have your knitted piece finished, you will need to cut out the lining. Pin the flat piece (before you seam it) to the fabric and mark a 1/2" seam allowance all the way around with tailors chalk.


5) Now pin the bottom seams on both your knitted fabric and lining and stitch together. This forms the 3D shape.


6) Time for the zip! Pin and stitch in one side at a time, taking care not to stretch the knitted fabric. This can be a little tricky, but I found the most important thing here was to make sure my stitches were small and fairly close to the edge. Using the same colour cotton will make your small stitches almost invisible.

7) Pin the lining to the inside and the hand stitch in place. Remember that you will want all of the rough side of your seams to be hidden inside, so plan ahead for that.


8) Add the garter stitch loop as detailed in the Pontus pattern, or make something small and fun with scraps for added kid appeal! This cute chap is the Tiny Dinosaur from Teeny Tiny Mochimochi by Anna Hrachovec made with some left over Naturally Soft Merino sportweight in teal. I know my son is sixteen, but I say you're never too old for great knits, or cute dinosaurs!
(posted by Max)
Allah razı olsun ara ara bulamamıştım bu gevurlar çok fena valla
ReplyDeleteDo you mind if I quote a couple of your posts as long as I provide credit and sources back to your website? My website is in the exact same niche as yours and my visitors would definitely benefit from a lot of the information you provide here. Please let me know if this okay with you. Cheers!
ReplyDeleterobes de no